Administration & Configuration
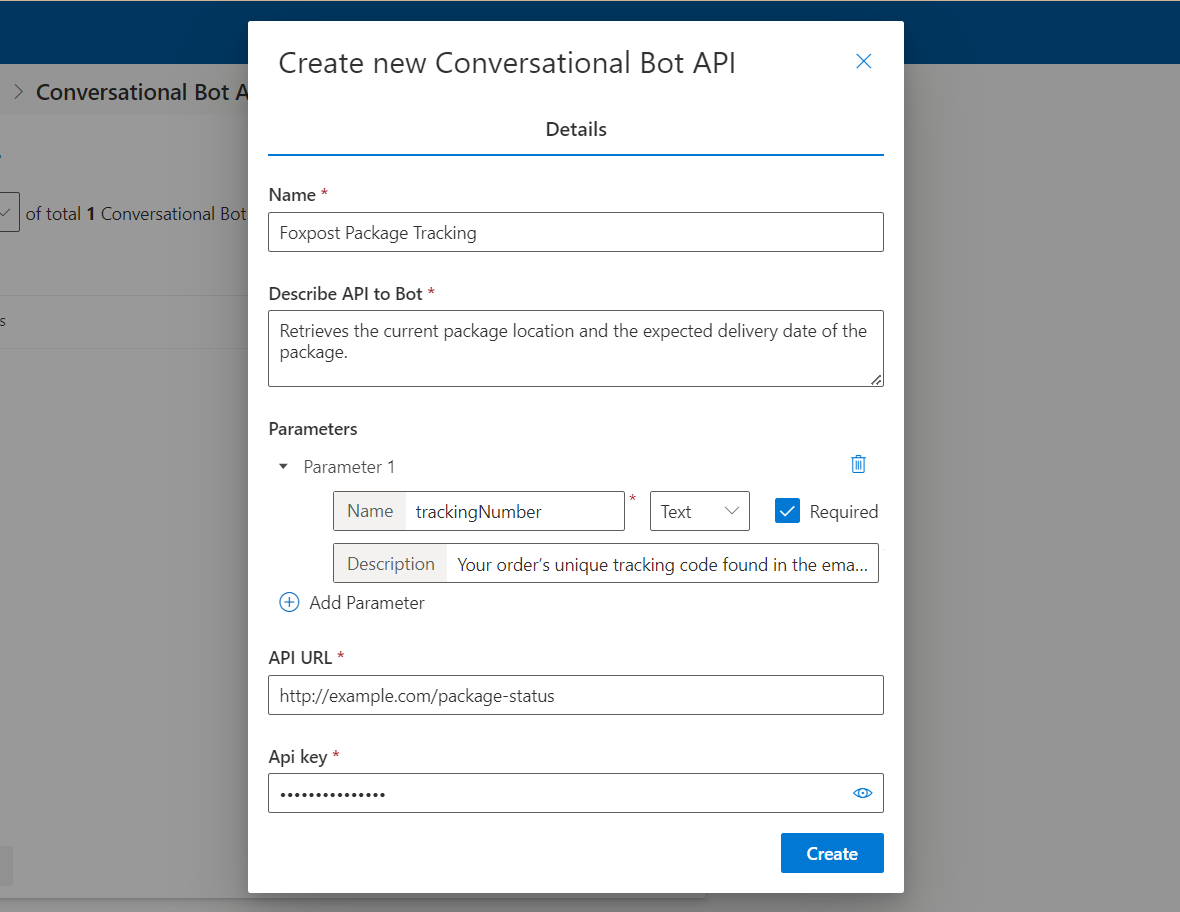
Manage your Conversational Bot Integrations through the Buzzeasy Portal under "Integrations" → "Conversational Bot APIs." Here, you can create and maintain the APIs your bots can call when users request information or ask to complete a task.
Setup Steps:
Create a New API Entry: Click "Create" and assign a clear, descriptive name. Examples:
- "Package Tracking" (for retrieving parcel locations)
- "Appointment Booking" (for scheduling or rescheduling appointments)
API URL: Input the endpoint that returns the desired data or executes the required action.
Authentication:
- Provide your endpoint’s API key.
Description for the Bot: Briefly describe the API’s purpose and conditions for use. For example:
- "Use this API to fetch the current status of a customer’s package."
- "Use this API to modify the delivery date upon customer request."
or you can just describe it
- "Modifies the booking date to the desired one"
- "Retrieves the current package location and the expected delivery date of the package."
The bot uses this description to decide when to invoke the API.

Defining and Managing Parameters
APIs often need certain parameters—like a tracking number, order ID, or customer email—to return the correct data. In Buzzeasy, you define these parameters directly in the API configuration.
Parameter Purpose:
- For Retrieval: If the user asks, "Where is my package?" the bot might need a "TrackingNumber" parameter to query the shipping API.
- For Task Execution: If the user says, "Please reschedule my appointment," the bot might need parameters like "CustomerID" and "PreferredTimeSlot" to update the booking system.
- If a parameter is required, the bot will automatically prompt the user for it if not already known from the conversation context.
Parameter Types:
- Text:
- Example: "TrackingNumber" as a text parameter.
- The bot might ask, "Could you please provide your tracking number?"
- Text parameters can handle general strings like names, IDs, or codes.
- Number:
- Example: "OrderID" as a number parameter.
- The bot might say, "Please provide your 6-digit order ID."
- Numbers are ideal for purely numeric IDs or quantities.
- Boolean:
- Example: "IsExpressShipping" as a boolean.
- The bot might ask, "Is this shipment express?" and the user can respond with "Yes" or "No."
- Boolean parameters help with scenarios where you need a simple true/false answer.
- Choice:
- Example: "DeliveryMethod" could be defined as a choice parameter with values like "Standard," "Express," and "Same-Day."
- The bot might say, "Please select a delivery method: Standard, Express, or Same-Day."
- Choice parameters present a predefined set of valid inputs, guiding the user toward a specific set of options.
How Parameters Work in Practice:
- When the bot encounters a situation where it needs to call an API, it first checks if all required parameters are known.
- If not, the bot will automatically prompt the user in natural language. For instance: User: "Where’s my package?" Bot (API needs a tracking number): "I can check that for you. Could you please provide your tracking number?"
- Once the user provides the tracking number, the bot includes that parameter in the API call.
- If the parameter type is "Choice," the bot will list the available options to the user, helping them select an appropriate one. (depending on your instructions if you want the bot to list it or not)
- After collecting all necessary parameters, the bot calls the API, processes the response, and then presents the result back to the user.
Tips for Effective Parameter Setup:
- Use Clear Names: Give each parameter a descriptive name (e.g., "TrackingNumber" rather than "Param1").
- Add Helpful Descriptions: Provide short, user-friendly descriptions so the bot can form natural prompts (e.g., "Your order’s unique tracking code found in the email or SMS we sent out beforehand.").
- Mark Required Parameters: If certain information is essential for the API call, mark those parameters as required. The bot will always prompt for them if they’re not known.
- Use Choices for Predictable Inputs: If the user must pick from a fixed set of options (like shipping speeds or payment methods), set the parameter type to "Choice" for an improved user experience.
Retrieving Information Example
Scenario: The user asks: "Where is my package?"
- Bot Checks Parameters: The "Package Tracking" API needs a "TrackingNumber."
- Bot Requests Info: If not known, bot asks: "Can you provide your tracking number?"
- User Provides: "123-ABC-7890"
- Bot Calls API: Sends the tracking number to the Package Tracing API.
- Bot Receives Data: The API responds with the package’s current location and delivery date. For example:
{"location": "Distribution Center," "deliveryDate": "2024-12-16"} - Bot Responds: "Your package is currently at the distribution center and will arrive tomorrow."
Executing Tasks Example
Scenario: The user requests: "Please reschedule my appointment to the morning slot."
- Bot Checks Parameters: The "Appointment Booking" API might require "CustomerID" (Text) and "PreferredTimeSlot" (Choice: Morning, Afternoon, Evening).
- Bot Gathers Info: If it doesn’t have "CustomerID," it asks: "Could you provide your customer ID?" If it doesn’t have "PreferredTimeSlot," it offers options: "Morning, Afternoon, or Evening?"
- User Responds: "My ID is CUST-4567. I want Morning."
- Bot Calls API: With both parameters known, the bot updates the appointment.
- Bot Receives Confirmation: The API responds with a success message. For example:
{"success": true, "timeSlot": "09:00"} - Bot Confirms: "Your appointment has been successfully rescheduled for tomorrow at 9 AM."