Custom Chat Bot
In this section, we will explore the Custom Bot feature of Buzzeasy. Custom Bots enable you to create an interface for your solution to interact directly with customers within the Buzzeasy system.
Setting Up the Custom Chat Bot
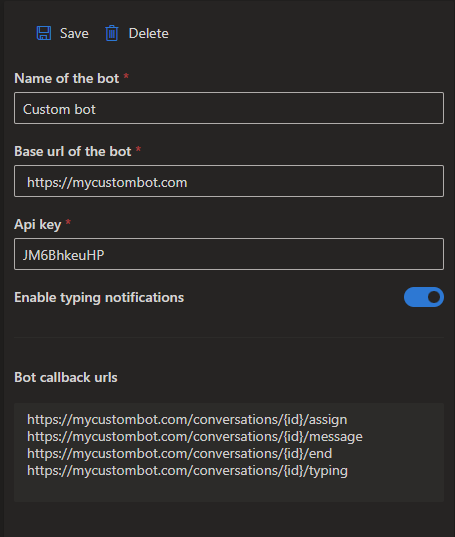
You can configure Custom Bots on the Portal under the Integration/Chat Bots section. The configuration requires the following fields:
- Name: This is the name you want to give to your bot.
- Base URL: This is the URL of your bot server where Buzzeasy will send HTTP requests.
- API Key: This is a secret key generated by you. Buzzeasy will include this key in the
x-api-keyHTTP header when it makes HTTP requests to your bot. You can validate this key on your bot server to ensure the request is from Buzzeasy.
Additionally, you can choose to receive typing notifications from customers by toggling the "Enable typing notifications" option.
Once you have saved your custom bot configuration, Buzzeasy will call the following endpoints on your bot server when certain events occur:
- Conversation Assigned: https://<your_bot_base_url>/conversations/<conversation_id>/assign - This endpoint is called when a conversation is assigned to your bot. The conversation_id in the URL is the ID of the assigned conversation.
- Message: https://<your_bot_base_url>/conversations/<conversation_id>/message - This endpoint is called when a message is sent in the conversation your bot is participating in.
- Conversation End: https://<your_bot_base_url>/conversations/<conversation_id>/end - This endpoint is called when the conversation your bot is participating in ends.
- Typing (Optional): https://<your_bot_base_url>/conversations/<conversation_id>/typing - This endpoint is called when the customer starts or stops typing. This endpoint is only called if you have enabled the "Enable typing notifications" option.
Inbound
In the following sections, we will provide a detailed description of each endpoint, including example JSON data for both requests and responses.
Conversation Assigned Endpoint
Endpoint: https://<your_bot_base_url>/conversations/<conversation_id>/assign
This endpoint is invoked when a conversation is assigned to your bot. The conversation_id in the URL is the unique ID of the assigned conversation. Some notes for the request body: customerMessage contains the last customer message which triggered the Custom Bot node execution and the botProperties dictionary contains the properties which you defined in the workflow editor Custom Bot node parameters.
Your server should respond with a 200 OK HTTP status to acknowledge the assignment.
Example request body:
{
  "$schema": "http://json-schema.org/draft-07/schema#",
  "type": "object",
  "properties": {
    "workflowData": {
      "type": "object",
      "additionalProperties": {
        "type": "string"
      }
    },
    "customerId": {
      "type": ["string", "null"]
    },
    "channelId": {
      "type": "integer"
    },
    "channelType": {
      "type": "string"
    },
    "customerMessage": {
      "type": "object",
      "properties": {
        "message": {
          "type": ["string", "null"]
        },
        "attachments": {
          "type": "array",
          "items": {
            "type": "object",
            "properties": {
              "contentType": {
                "type": ["string", "null"]
              },
              "contentUrl": {
                "type": "string"
              },
              "name": {
                "type": "string"
              }
            },
            "required": ["contentUrl", "name"],
            "additionalProperties": false
          }
        }
      },
      "additionalProperties": false
    },
    "botProperties": {
      "type": "object",
      "additionalProperties": {
        "type": "string"
      }
    }
  },
  "required": ["channelId", "channelType"],
  "example": {
    "workflowData": {
      "key1": "value1",
      "key2": "value2"
    },
    "customerId": "12345",
    "channelId": 1,
    "channelType": "Email",
    "customerMessage": {
      "message": "Hello",
      "attachments": [
        {
          "contentType": "image/jpeg",
          "contentUrl": "https://example.com/image.jpg",
          "name": "Image1.jpg"
        },
        {
          "contentType": "application/pdf",
          "contentUrl": "https://example.com/document.pdf",
          "name": "Document.pdf"
        }
      ]
    },
    "botProperties": {
      "property1": "value1",
      "property2": "value2"
    }
  }
}public class AssignConversationModel
{
public Dictionary<string, string> WorkflowData { get; set; } = new Dictionary<string, string>();
public string? CustomerId { get; set; }
public int ChannelId { get; set; }
public string ChannelType { get; set; } = null!;
public CustomerMessageModel CustomerMessage { get; set; } = new CustomerMessageModel();
public Dictionary<string, string> BotProperties { get; set; } = new();
}
public class CustomerMessageModel
{
public string? Message { get; set; }
public List<AttachmentModel> Attachments { get; set; } = new List<AttachmentModel>();
}
public class AttachmentModel
{
public string? ContentType { get; set; }
public string ContentUrl { get; set; } = null!;
public string Name { get; set; } = null!;
}Message Endpoint
Endpoint: https://<your_bot_base_url>/conversations/<conversation_id>/message
This endpoint is triggered when a message is sent in the conversation your bot is participating in.
Your server should respond with a 200 OK HTTP status to acknowledge the message.
Example request body:
{
  "$schema": "http://json-schema.org/draft-07/schema#",
  "type": "object",
  "properties": {
    "message": {
      "type": ["string", "null"]
    },
    "attachments": {
      "type": "array",
      "items": {
        "type": "object",
        "properties": {
          "contentType": {
            "type": ["string", "null"]
          },
          "contentUrl": {
            "type": "string"
          },
          "name": {
            "type": "string"
          }
        },
        "required": ["contentUrl"]
      }
    }
  },
  "example": {
    "message": "Hello",
    "attachments": [
      {
        "contentType": "image/jpeg",
        "contentUrl": "https://example.com/image.jpg",
        "name": "Image1.jpg"
      },
      {
        "contentType": "application/pdf",
        "contentUrl": "https://example.com/document.pdf",
        "name": "Document.pdf"
      }
    ]
  }
}public class CustomerMessageModel
{
public string? Message { get; set; }
public List<AttachmentModel> Attachments { get; set; } = new List<AttachmentModel>();
}
public class AttachmentModel
{
public string? ContentType { get; set; }
public string ContentUrl { get; set; } = null!;
public string Name { get; set; } = null!;
}Conversation End Endpoint
Endpoint: https://<your_bot_base_url>/conversations/<conversation_id>/end
This endpoint is called when the conversation your bot is participating in ends. The request body is empty in this case.
Your server should respond with a 200 OK HTTP status to acknowledge the end of the conversation.
Typing Endpoint (Optional)
Endpoint: https://<your_bot_base_url>/conversations/<conversation_id>/typing
This endpoint is called when the customer starts or stops typing. This endpoint is only called if you have enabled the "Typing Notifications" option. The request body is empty in this case.
Your server should respond with a 200 OK HTTP status to acknowledge the typing notification.
Outbound
For the outbound part, where your bot sends requests to Buzzeasy, a Swagger document is provided on the next page. This document describes each endpoint and its models, which you can use to implement the outbound part of your bot.
Getting the Bot Id
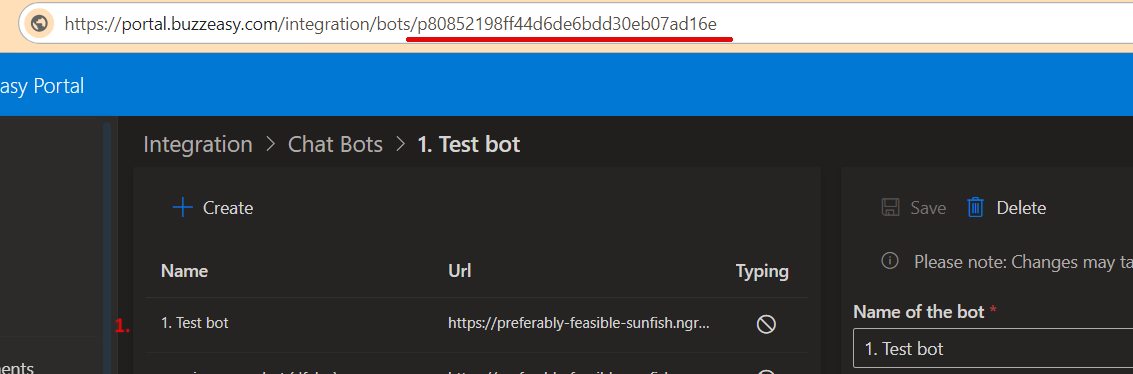
- Click on the selected Chat Bot
- Copy the Bot ID from the end of the URL
Authentication
To send outbound messages, you need to include a GOAuth access token in each HTTP request. The authentication process is described on the Authentication page. The required scope is 'bot'.
Adding Custom Bot to Workflow
Once you have set up a Custom Bot as described in the previous sections, the next step is to add it to a workflow. Here's how to do it:
- Navigate to the workflow editor in the Buzzeasy portal.
- Add a new Custom Bot node to your workflow
- Inside the node, select the Custom Bot you created from the drop-down list.
Save the workflow. Now, whenever this workflow is executed, Buzzeasy will assign conversations to your Custom Bot based on the workflow conditions.
Remember, you can add multiple Custom Bot nodes in a single workflow, and each node can be configured to use a different Custom Bot. This allows you to create complex workflows that use multiple bots to handle different parts of a conversation.